Hope & Gloria - Sewing Inspiration for Children

Hope & Gloria - Sewing Inspiration for Children
Happy Mother's Day UK

Monday, October 7, 2013

Spooky Spider Bunting - A Halloween Decoration Tutorial


Autumn has arrived here at Hope & Gloria HQ. The leaves in the garden are beginning to turn colour ready for their beautiful Autumnal parade of yellows, oranges, and reds. The last of the apples are ready to be picked and my freezer is bursting with frozen blackberries after this year's bumper fruit crop.

The line from John Keat's Ode to Autumn is one that is overused but this year it really does feel like a "season of mists and mellow fruitfulness". Last week when the boys and I were leaving the house for the school run we were greeted with a murky mist outside, but on the flip side the damp fog served to highlight a carpet of truly stunning spider's webs all over the garden - I had to take a few pics.


Whether you are fond of spiders or not, you have to admire these industrious little creatures - the display of their handiwork is one of nature's marvels. My mother and sisters are terrified of spiders and one of my boys is not too keen either Thankfully, I am not scared of these eight legged friends which is a good because we do seem to get more than our fair share of them making themselves at home in our house.

Spiders and their stunning webs are the inspiration for this Halloween sewing idea. Easy to make and effective it will look great draped across a window, wall or doorway on 31st October. 

For part of this project I used burlap (also known as hessian). I wanted to give the bunting a folk art feel rather than using the traditional oranges and blacks found in most Halloween decorations and I have seen burlap used in folk art Christmas Decorations with great effect. Burlap can be tricky to work with - you need to be careful not to fray the edges as you work but the end results are fab giving the decorations a rustic feel.


Here's how to make my Spooky Spider Bunting:

You will need:


  • Felt triangles (width at top 15cm, length 20cm), or burlap (hessian), for 1m of bunting you will need 5 triangles in total.
  • Cotton thread
  • Felt "Spider Bodies"
  • Embroidery thread
  • Ribbon


Step 1. Spider's Web Flags

Embroider your spider's web on to a felt triangle. 


First draw a spider's web design on to the felt - I used an air soluble embroidery pen. These can be bought in most haberdashery shops and are a brilliantly useful addition to your sewing box. Designs can be drawn on to most fabric giving you a guide to sew on to. Within 36 hours the ink will have faded beneath the design leaving just your embroidered pattern on show.

If you don't have an air soluble pen a thin line drawn with a narrow tipped pen will work just as well. Your thick embroidery thread should cover  the ink.


Using backstitch sew your spider's web on to the felt following the pattern you have drawn. If you are unsure of how to backstitch take a look at our guide by clicking here 

For my design I used cream thread on a dark grey background but other more traditional "Halloween colours" such as purples, oranges, blacks and green would work just as well.


Step 2. Spooky Spider Flags


Sew your spider's body on to the burlap flag using backstitch.


Now add eight legs again using backstitch.


Step 3


Decide on the layout of your flags. I placed a grey spider's web on cream felt at the centre, then two spiders facing in opposite directions were placed on either side with cream webs on grey felt on the outside.


Step 4


Now position your ribbon across the top of each flag and sew in to place. It is easier to work from the centre outwards leaving a small gap of approx 3cm inbetween each flag.


Step 5


Now your Spooky Spider Bunting is complete - all you need to decide is where to hang it!


Friday, September 6, 2013

Lavender Harvest

Back in July I posted a tutorial for lavender hearts (click here to view tutorial) featuring this picture -


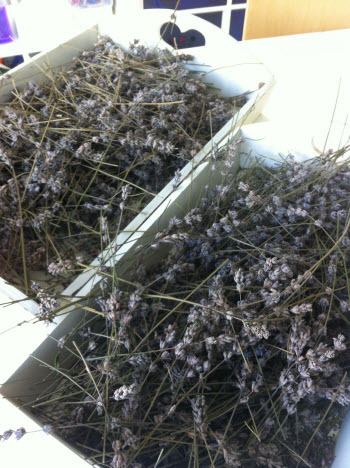
beautiful lavender bushes in our garden. Just before we went on our hols the time had come to cut the lavender flowers and this was the result; a bumper harvest! I am not sure if this year's fabulous summer weather was responsible for this lovely crop but I was delighted to be able to cut so many beautifully scented flowers from just a few plants - brilliant!


These two trays full of gorgeous lavender flowers have been slowly drying out in our airing cupboard for the past three weeks with the added benefit of making our towels and bed linen smell heavenly!


Today I have been cutting the flowers from the stems, (quite a long and boring task), ready to store in airtight bags until October half term.

I have a plan for my homegrown lavender - it will be just perfect for a project that I have in mind for our October Half Term Holiday Workshops - details to follow shortly.

Wednesday, September 4, 2013

Our Creative Summer Challenge


In July with the long Summer Holidays stretching before them the Hope & Gloria Team set a challenge for some of our club members. We asked them - What will you make this Summer?

We provided a "mini-kit" consisting of 2 pieces of felt, 2 pieces of fabric some buttons and some thread along with a set of instructions: to create their own sewn project making use of the materials of provided. This could either be used as a starting point (including the fabric as part of a larger project), or the kit could be used to create an entire project.

As we suspected our lovely club members did not disappoint and at Hope & Gloria HQ we were amazed by the children's creativity. Our top three projects are featured below:


This fabulous fabric house created by Lucy is just brilliant! The whole team thought the use of fabric was excellent and what a great idea for a pin cushion that doubles as a needle case. Well done Lucy for all of your hard work.


This cute coin purse was created by Natasha and demonstrates perfectly how it is possible to make something fabulous without needing a huge amount of supplies. A big well done to Natasha.


Finally, well done to Connie. This lovely cosmetic bag is a brilliant use of  patchwork technique and the zip is sewn in perfectly resulting in a stylish bag that anyone would be proud to use. Great work Connie!


Our three featured super sewing enthusiasts will be receiving a Hope & Gloria Mini Sewing Kit shortly. Well done girls from the Hope & Gloria Team and we look forward to seeing you either in a school club or holiday workshop soon!

Friday, August 16, 2013

Last Of The Summer Workshops

This morning's workshop was just lovely. After a quick practice at backstitch we got to work to make some lovely "Fab Fabric Pictures" all with a Summer theme. There were beach huts, vintage caravans and cupcakes a plenty all appliquéd on to Summer bright fabric and framed ready to adorn the walls and bring the Summer sunshine indoors.

Everyone who came along worked brilliantly and should be hugely proud of the results they achieved. Here are some of the gorgeous results:


As always an enormous well done to all who came along.

This was the last of the Hope & Gloria workshops for this Summer Holiday. It will soon be time to get sewing on our fabulous Autumn projects when we return to our school sewing clubs in three weeks time - everyone at Hope & Gloria HQ is very excited!

Enjoy the rest of the sunshine!


Wednesday, August 14, 2013

Fabric for Friends & Family


As I have mentioned before I am a total fabric addict. I could spend hours in fabric shops and on-line hunting for new patterns and colours to use in my sewing projects. Sometimes I just buy because I like it and put it away knowing it will come in use for something at some point (hopefully).

And then there are the occasions when you see fabric and someone automatically springs to mind. This is exactly what happened with the two projects I made yesterday.


My Mother-in-law is arriving for a visit tomorrow and this bag is part of her birthday present from the family. When I first saw this sailing themed fabric I knew it would be perfect for her - she is a fan of taupe/beige colours and used to sail a lot, so this lovely patterned fabric couldn't be better. I used it as a centre panel and added a base and upper edge in taupe polka dot to make it a little more interesting. The handles are also made from the dotty fabric. As the sailing themed fabric has a splash of pink here and there, I used a pink ticking stripe cotton as the lining which looks fab. It's an ideal bag for the beach or summer shopping - I hope she loves it.


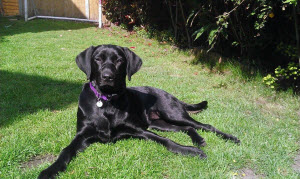
I am officially banned by my family from acquiring any more pets - we currently have a dog, a cat and three guinea pigs so I guess we do have quite a menagerie. If that ban was ever lifted I would love to have a dog just like this gorgeous girl - Bella.


She belongs to a very special friend and is the sweetest dog I know (except for Elsie our dachshund, of course). My friend and Bella came to mind when I found this adorable fabric and I began to think about what I could make with it. Animal themed fabric can often be just too cutesy for my liking but I was delighted to find this simple but classy taupe fabric with a delightful black Labrador motif and cream dot - perfect for a gift for a friend.


This is what I made...


... a cute and quirky, teapot cosy. Tea cosies are a great way to bring a decorative touch to a kitchen. Even if you don't use a teapot they look good sitting on a shelf or a tray to bring a lovely vintage accent to the room. They are easy to make - I am a huge fan. To finish off I added cream bobble edging to tone in with the cream dot of the fabric and cream calico lining, but ribbon or bias binding are just as good when it comes to adding a finishing touch.

So that's my second gift completed and ready to give - must be time for tea. xx


Saturday, August 10, 2013

A Super Summer Upcycling Workshop


Yesterday morning I had the best time making these adorable "No Sew Fabric Hearts" with a lovely group of children. These hearts are another brilliant way to make use of outgrown clothes and to upcycle them into a simple but very pretty and summery decoration for the home,


We used lots of brightly coloured "Summery" fabric to make our hearts cute and colourful. These were followed by button hearts in summer brights to bring a splash of summer sunshine indoors.

As always a huge well done to all of you that attended - your hearts were "lovely"!

If you didn't manage to make it to this workshop you can click here to find full instructions to make one of your own at home. Enjoy!

Tuesday, August 6, 2013

T-Shirt Bag Tutorial - Make An Upcycled Accessory


Last Friday we had a fabulous workshop in Sunningdale - Upcycled T-Shirt Bags. The girls who came along for the morning were incredibly creative and walked away with some truly stunning creations that will look great on the beach, at a barbecue or shopping around town. Well done to everyone who attended - some of your beautiful bags are featured below.

For those of you who were unable to attend I thought I'd share this tutorial on how to make your own bag from an outgrown or pre-loved t-shirt. These bags are a great quick make and an inexpensive way to accessorise this Summer.

You will need:

1 t-shirt, thread, and something to decorate. For this bag I used funky wide ribbon that I had left over from another project but beads, buttons or pieces of fabric can be used to decorate. (For ideas take a look at the bags that were made in the workshop below)


Step one:


Make the openings for the bag by cutting off the sleeves but leaving the armhole seams in place as this will act to add strength to your handles. Cut a deep rounded "V" shape around the neck opening of the t-shirt. This should reach to just below the bottom edge of the armholes.


Step two:


Now you need to strengthen the edges of your bag. Fold the fabric edges inwards by 1/2cm and sew small neat stitches around the edge. You can use any stitch to reinforce the edges and prevent fraying. For this bag I used over stitch in a contrasting thread. Fold and sew around all of the three edges you have cut in step one.


Step three


Now you need to change your t-shirt shape into a bag. To do this line up the side seams of the t-shirt so that they are lying one directly on top of the other. The previous armholes have now become handles and these too should line up with each when laid flat.


Step four

Time to decorate. This is when you can be as creative as you like. I have added some wide ribbon and a bow across the front of this bag.


Step five

Trim your bag to size. If you leave the shape as it is you will have more of a rectangle shaped bag, or you can trim some of the fabric from the bottom as I did here to make more of a square shaped bag.


Step six

Turn your bag inside out and again make sure that the side seams are lined up in the middle lying one on top of the other. The handles at the top should also lie on top of each other. Pin and sew across the bottom of the bag. Backstitch is best for this as it will make the seam stronger.

Once this is done turn your bag the right way round and it is ready for use - a fabulous upcylced accessory!

Here are some of the bags that we made at the Hope & Gloria Sewing Workshop last week. Top tip: For these bags we used "vest" style t-shirts. The shape of the t-shirts means that it is not necessary to trim and sew the seams around the top so you don't have to do stage one and two above. Don't they look brilliant?