Hope & Gloria - Sewing Inspiration for Children

Happy Mother's Day UK
Monday, December 24, 2012
Merry Christmas!
It's finally here! All of the presents are wrapped, family have arrived safely and last minute food prep is taking place. There are. three very excited boys in our house and a number of excited adults too. Wishing evryone a very Merry and relaxing Christmas. xx
Saturday, December 22, 2012
Last Minute Finishing Touches
It has been a mad couple of weeks in our home. We have had birthday celebrations, school concerts, parties, Christmas gatherings with family and friends and not to mention many frantic Christmas shopping trips.All of this has taken a lot of planning/juggling in amongst the final Hope & Gloria sewing clubs sessions for 2012. As always Christmas is a busy time but also it truly is the most wonderful time of the year and I love it!
When it comes to sewing or crafting of any kind Christmas never fails to bring endless inspiration and with a couple of days to go until the big day I now realise that a few of my planned sewing projects are still unfinished and will have to remain so until next year as there is still a cupboard full of presents waiting to be wrapped.
However, I am pleased that I have managed to cram in two more quick projects for the big day just in the nick of time..

Providing a fabulous setting for a wonderfully cooked Christmas lunch is part and parcel of the festivities in most homes - it certainly is in ours. Dressing the table has a huge role to play in making Christmas Day lunch feel that extra bit special and this year I have combined place settings with napkin rings to creat something personalised and special for our family's Christmas lunch.
The six napkin rings began life as plain wooden rings which I painted using a tester pot of emulsion paint. They were then sealed with Decopatch varnish which gives a light sheen. Each napkin ring is personlised using cross-stitch. I love cross-stitch - it is neat and simple and gives great results and these days there are loads of funky patterns in magazines which are easy to follow. Once our family members names were completed I fixed them to the wooden rings using double sided tape. This proved to be a really simple but effective project and they will look fab with the white table cloth, red table runner and Scandinavian style candle holders I have bought for dressing our table this year.
The white reindeer is something I have wanted to make since I found the pattern for a brown reindeer in a magazine back in October. Mine is white to match the table colour scheme and if I can finally get those presents wrapped in time I shall make a red one to accompany him on the table on Christmas Day!
When it comes to sewing or crafting of any kind Christmas never fails to bring endless inspiration and with a couple of days to go until the big day I now realise that a few of my planned sewing projects are still unfinished and will have to remain so until next year as there is still a cupboard full of presents waiting to be wrapped.
However, I am pleased that I have managed to cram in two more quick projects for the big day just in the nick of time..
Providing a fabulous setting for a wonderfully cooked Christmas lunch is part and parcel of the festivities in most homes - it certainly is in ours. Dressing the table has a huge role to play in making Christmas Day lunch feel that extra bit special and this year I have combined place settings with napkin rings to creat something personalised and special for our family's Christmas lunch.
The six napkin rings began life as plain wooden rings which I painted using a tester pot of emulsion paint. They were then sealed with Decopatch varnish which gives a light sheen. Each napkin ring is personlised using cross-stitch. I love cross-stitch - it is neat and simple and gives great results and these days there are loads of funky patterns in magazines which are easy to follow. Once our family members names were completed I fixed them to the wooden rings using double sided tape. This proved to be a really simple but effective project and they will look fab with the white table cloth, red table runner and Scandinavian style candle holders I have bought for dressing our table this year.
The white reindeer is something I have wanted to make since I found the pattern for a brown reindeer in a magazine back in October. Mine is white to match the table colour scheme and if I can finally get those presents wrapped in time I shall make a red one to accompany him on the table on Christmas Day!
Monday, December 10, 2012
Sweet Smelling Stockings
With only two weeks to go until Christmas Eve I am beginning to feel the panic creeping in - many presents are bought but I am conscious that I still have a long way to go to make sure that there is something for everyone under our tree and that smiley faces will be guaranteed on Christmas morning.
As well as buying gifts for family at Christmas many of us find that we are also in need of a good supply of smaller gifts to be giving as tokens to say "Thank you" or just to let people know that you care - teachers being one of them. Children love to give gifts to teachers at Christmas and it's a great opportunity to show that you appreciate all of the support and hard work from a favourite teacher that children are given throughout the year.
It can be tricky to come up with something original and this year I have decided not to resort to the usual chocolates which although delicious, teachers receive in abundance at Christmas. This is where my earlier soap project comes in to play.
I have had tonnes of festive fun designing the packaging! The soaps have been wrapped firstly in white greaseproof oven paper to help prevent them from losing the scent and then in lovely brown parcel paper which works brilliantly simpy tied with a cream and red gingham ribbon which matches the colour scheme of the felt stockings that I have made to put them in.

These cute mini stockings cost very little to make and take no time at all. Continuing with my Nordic obsession this Christmas I chose a cream felt and red thread to decorate. I love pom pom trims - they give a lovely vintage feel to sewing projects and are easily available to buy in most sewing/haberdashery shops. After sewing pom poms around the top I decorated the stocking using simple running stitch, cross stitches with a few stars sewn on for good measure. The edges were sewn up using blanket stitch.

The bar of soap fits perfectly inside the stocking and the boys teachers' gifts are now complete and ready to be taken to school at the end of next week. Another job done.....now on to the next one!
As well as buying gifts for family at Christmas many of us find that we are also in need of a good supply of smaller gifts to be giving as tokens to say "Thank you" or just to let people know that you care - teachers being one of them. Children love to give gifts to teachers at Christmas and it's a great opportunity to show that you appreciate all of the support and hard work from a favourite teacher that children are given throughout the year.
It can be tricky to come up with something original and this year I have decided not to resort to the usual chocolates which although delicious, teachers receive in abundance at Christmas. This is where my earlier soap project comes in to play.
I have had tonnes of festive fun designing the packaging! The soaps have been wrapped firstly in white greaseproof oven paper to help prevent them from losing the scent and then in lovely brown parcel paper which works brilliantly simpy tied with a cream and red gingham ribbon which matches the colour scheme of the felt stockings that I have made to put them in.
These cute mini stockings cost very little to make and take no time at all. Continuing with my Nordic obsession this Christmas I chose a cream felt and red thread to decorate. I love pom pom trims - they give a lovely vintage feel to sewing projects and are easily available to buy in most sewing/haberdashery shops. After sewing pom poms around the top I decorated the stocking using simple running stitch, cross stitches with a few stars sewn on for good measure. The edges were sewn up using blanket stitch.
The bar of soap fits perfectly inside the stocking and the boys teachers' gifts are now complete and ready to be taken to school at the end of next week. Another job done.....now on to the next one!
Sunday, December 2, 2012
Soap & Gloria
Firstly, apologies for the pun on this blog's name but I felt I just had to use it!
This weekend I have taken a departure from my usual crafting activities and have not used a needle and thread at all. On Friday morning I was very excited to take delivery of soap making supplies which made a pleasant change from the arrival of online orders of Christmas presents that are being delivered at a steady pace at the moment.

Soap making is not something I have ever tried up until now but having visited a number of craft and gift fairs over the past few months I have been inspired by the delicious scents and textures in handmade soaps that I have seen being sold by very clever crafters.
This year I have decided to have a go at making my own to give as Christmas gifts. Yesterday morning with the help of two of my boys I set to work in the kitchen melting the soap base and adding fragrance and colour. My first attempt was to be a straightforward one and I opted for that old favourite - Lavender Soap. We also added some Lavender petals that were left over from some Lavender bags that I made in The late Summer.
This afternoon having left the soap to set for 24 hours (plus a couple of extra to be on the safe side), I gently prised our soap from the mould to find it had set perfectly! The soap was then cut into bars and I have to say I am absolutely delighted with the results.
 Eight beautifully scented bars of Lavender Soap ready to be given as gifts this Christmas. I really think soap making may be addictive and I am looking forward to trying new fragrances and shapes as soon as possible.
Time to move on to the next stage of my plan for these gifts - the packaging which I am looking forward to sharing in a week's time.
This weekend I have taken a departure from my usual crafting activities and have not used a needle and thread at all. On Friday morning I was very excited to take delivery of soap making supplies which made a pleasant change from the arrival of online orders of Christmas presents that are being delivered at a steady pace at the moment.
Soap making is not something I have ever tried up until now but having visited a number of craft and gift fairs over the past few months I have been inspired by the delicious scents and textures in handmade soaps that I have seen being sold by very clever crafters.
This year I have decided to have a go at making my own to give as Christmas gifts. Yesterday morning with the help of two of my boys I set to work in the kitchen melting the soap base and adding fragrance and colour. My first attempt was to be a straightforward one and I opted for that old favourite - Lavender Soap. We also added some Lavender petals that were left over from some Lavender bags that I made in The late Summer.
This afternoon having left the soap to set for 24 hours (plus a couple of extra to be on the safe side), I gently prised our soap from the mould to find it had set perfectly! The soap was then cut into bars and I have to say I am absolutely delighted with the results.
Time to move on to the next stage of my plan for these gifts - the packaging which I am looking forward to sharing in a week's time.
Tuesday, November 27, 2012
O' Christmas Tree
It is exactly two weeks until we'll be heading off to the local garden centre to buy our Christmas Tree and bringing it home tied precariously to the top of our car to be decorated with our much loved decorations that we have gathered over the years. We always leave it a bit late as there are two very important birthdays in our house at the beginning of December - one of them being mine!
When it comes to Christmas trees in our home it simply has to be a real one. There is something fabulous and uplifiting about the scent of a good old Nordic Spruce filling the home. Artificial trees are just not an option, although when it gets to December 27th and everyone is complaining about pine needles stuck in their socks and the dog is looking forlorn as she gets yet another stuck in her foot I will probably be making an oath to invest in an artificial tree next year!
The Christmas tree was introduced to Great Britain during the reign of George III by Princess Charlotte who brought the custom from her native Germany where they had been popular for many years but they were only used as decoration among the nobility. It was popularised during the Victorian era. I am so grateful to Victoria and Albert as there surely can be no better centerpiece when it comes to decorating the home at Christmas!

Inspired by the fabulous Christmas Tree I have made these adorable decorations using felt buttons and beads.
They are made by decorating a quarter circle of felt with beads or buttons of your choice - you can keep it simple or go to town with a riot of shapes and colours. The tree in the centre of the picture has "Tinsel" added using backstitch. Sew up the two stright edges with the "decorations" facing inwards and then turn outwards so that the decorations are back on the outside.
Fill with soft toy filling making sure they are firmly padded to keep the shape and then sew on a circular felt base using over-stitch.
These miniature trees are the perfect way to add a splash of colour to a mantelpiece, shelf, table or any space in need of some fun festive cheer.
When it comes to Christmas trees in our home it simply has to be a real one. There is something fabulous and uplifiting about the scent of a good old Nordic Spruce filling the home. Artificial trees are just not an option, although when it gets to December 27th and everyone is complaining about pine needles stuck in their socks and the dog is looking forlorn as she gets yet another stuck in her foot I will probably be making an oath to invest in an artificial tree next year!
The Christmas tree was introduced to Great Britain during the reign of George III by Princess Charlotte who brought the custom from her native Germany where they had been popular for many years but they were only used as decoration among the nobility. It was popularised during the Victorian era. I am so grateful to Victoria and Albert as there surely can be no better centerpiece when it comes to decorating the home at Christmas!
Inspired by the fabulous Christmas Tree I have made these adorable decorations using felt buttons and beads.
They are made by decorating a quarter circle of felt with beads or buttons of your choice - you can keep it simple or go to town with a riot of shapes and colours. The tree in the centre of the picture has "Tinsel" added using backstitch. Sew up the two stright edges with the "decorations" facing inwards and then turn outwards so that the decorations are back on the outside.
Fill with soft toy filling making sure they are firmly padded to keep the shape and then sew on a circular felt base using over-stitch.
These miniature trees are the perfect way to add a splash of colour to a mantelpiece, shelf, table or any space in need of some fun festive cheer.
Saturday, November 17, 2012
Christmas Scandi Star Tutorial
The Scandinavian folk art style has become incredibly popular around Christmas Time over the past couple of years. The simplicity of the designs and the use of red and white make a brilliant contrast with the deep green of a Fir Tree adding a stylish touch to the home at Christmas.

I love to use patterned fabric and felt together. These felt stars are made using a simple reverse applique technique. This means that a piece of fabric is sewn behind the main fabric to give a motif rather than in traditional applique where a fabric motif is sewn on top of the main fabric (as in the checked stars), and it works brilliantly to bring a splash of colour to the plain felt shape.
These Christmas stars are easy to make and will look great on a tree or as door hangers bringing a touch of Scandinavia to your home this Christmas. They can be made using scraps of felt and fabric that you have lying around and take no time at all to make simply follow the instructions below.
You will need:

Step one

Cut a small heart shape from the centre of one of the felt stars.
Step two

Cut a small piece of gingham fabric and position it behind the heart cut out.
Step three


Pin the felt back to the star and sew around the edges using blanket stitch leaving a small gap to add a small amount of toy filling to give some depth to the star but not too much as it will distort the shape. Sew up the remaining hole.
Step five

Make a loop through the top of the star using some of the cotton pearl thread. The fab felt folk art star is now complete and ready to add to my collection!
These stars also look great when made using gingham fabric with a felt heart sewn on the front - perfectly simple Scandinvian inspired decorations for the home this Christmas.
I love to use patterned fabric and felt together. These felt stars are made using a simple reverse applique technique. This means that a piece of fabric is sewn behind the main fabric to give a motif rather than in traditional applique where a fabric motif is sewn on top of the main fabric (as in the checked stars), and it works brilliantly to bring a splash of colour to the plain felt shape.
These Christmas stars are easy to make and will look great on a tree or as door hangers bringing a touch of Scandinavia to your home this Christmas. They can be made using scraps of felt and fabric that you have lying around and take no time at all to make simply follow the instructions below.
You will need:
- 2 x red felt star shapes - mine measure approx 10 x 10 com
- Scraps of gingham fabric in red or beige
- Cream cotton pearl thread
Step one
Cut a small heart shape from the centre of one of the felt stars.
Step two
Cut a small piece of gingham fabric and position it behind the heart cut out.
Step three
Sew the gingham in to place by using back stitch around the cut out heart.
Step four
Pin the felt back to the star and sew around the edges using blanket stitch leaving a small gap to add a small amount of toy filling to give some depth to the star but not too much as it will distort the shape. Sew up the remaining hole.
Step five
Make a loop through the top of the star using some of the cotton pearl thread. The fab felt folk art star is now complete and ready to add to my collection!
These stars also look great when made using gingham fabric with a felt heart sewn on the front - perfectly simple Scandinvian inspired decorations for the home this Christmas.
Monday, November 12, 2012
Rockin' Robin
There is only one bird that embodies the spirit of Christmas for me (except for the Turkey of course, but that's for entirely different reasons), - the gorgeous, fat, friendly Robin.

We have had a couple in our garden this year and I try to encourage them to visit with bird feeders crammed full of peanuts and sunflower seeds. However, the local squirrels seem to have other ideas at the moment and I have to say the squirrels are winning.. The squirrels are growing rather large on their peanut and sunflower diet, as is the amount of money I am spending on bird food!
We are making felt robin tree decorations in our sewing clubs in preparation for Christmas and I was asked by one girl why we associate robins with Christmas. To be honest I wasn't enirely sure so I decided to do some research. It seems that the jolly looking robin is steeped in folklore and here are some of the facts I have discovered:
My felt robin is round, fat, jolly and ready to bring a smile at Christmas. It is made from two simple brown felt "robin" shapes with a bright red breast sewn on to the front using white thread and blanket stitch to give the effect of the white edge that you will see around a robin's red breast. A small black button for the eye and a wing is added with blanket stitch. The edges can be sewn using running, over or blanket stitch. It contains a small amount of toy stuffing to add some depth. Looking forward to hanging him on the tree in a few weeks time.
We have had a couple in our garden this year and I try to encourage them to visit with bird feeders crammed full of peanuts and sunflower seeds. However, the local squirrels seem to have other ideas at the moment and I have to say the squirrels are winning.. The squirrels are growing rather large on their peanut and sunflower diet, as is the amount of money I am spending on bird food!
We are making felt robin tree decorations in our sewing clubs in preparation for Christmas and I was asked by one girl why we associate robins with Christmas. To be honest I wasn't enirely sure so I decided to do some research. It seems that the jolly looking robin is steeped in folklore and here are some of the facts I have discovered:
- In Norse mythology the Robin is associated with Thor the god of thunder and if you spotted one a thunderstorm was supposed to be on the way.
- An old British folktale tells of how the robin used to be fully brown until it flew too close to Jesus on the cross and was stained with his blood and since that point it had it's distinguishing feature - the red breast.
- The more probable reason that we have for associating robins with Christmas time comes from the Victorian era as do most of our Christmas traditions in the UK. In Victorian times British postmen wore red uniforms and their nickname was "Robins". The robins that began to be shown on Christmas cards were an emblem of the people delivering them.
My felt robin is round, fat, jolly and ready to bring a smile at Christmas. It is made from two simple brown felt "robin" shapes with a bright red breast sewn on to the front using white thread and blanket stitch to give the effect of the white edge that you will see around a robin's red breast. A small black button for the eye and a wing is added with blanket stitch. The edges can be sewn using running, over or blanket stitch. It contains a small amount of toy stuffing to add some depth. Looking forward to hanging him on the tree in a few weeks time.
Sunday, November 11, 2012

Monday, November 5, 2012
Woolly Mammoth - Further Adventures in Upcycling
Following on from the felted bag that I proudly upcycled from my charity shop find, here is my second project created from the felted stripey jumper.

The previously unwanted and unloved jumper has been turned into a fab cuddly toy who is ready to be cherished by a new owner. The felted wool fabric is certainly soft enough for great cuddles or this woolly mammoth would also look great sitting on a shelf as an accessory in a child's bedroom.
Although I do have a confession to make - not all of the elephant is upcycled. The ears are made from pink felt that was lying around my workroon in need of a purpose, and as it perfectly matches the pink stripe in the wool I just had to use it to bring a further splash of colour to this handsome creature!
Wednesday, October 31, 2012
Half Term Workshops - Fab Fleece Scarves
This morning's workshop was a huge success. We were all busy preparing for the cold Winter months making fab fleece scarves and the results were fantastic!

I love our school holiday workshops. It is always hugely satisfying when children complete their projects from start to finish in one morning and can take home something that is all their own work. It never ceases to amaze me how creative children can be and all of the designs are truly individual with no two being the same. Many of the children have been coming to our holiday workshops for over a year now and you can really begin to recognise their personalities in their creations. A huge well done to everybody!
Here are just a few of the children's fabulous scarves from today - can't wait to see what they will produce tomorrow.
Monday, October 29, 2012
Dachshund Draught Excluder
I live in a male dominated house. My husband and three boys account for the muddy rugby boots and ice hockey kit that is found lying around and I am sure that my passion for craft and creating generally pretty things is in some small way a compensation for the lack of pink to be found in our home.

However, I do have one female companion - our pet Dachshund Elsie. She is by no means a typical lady and is never happier than when she is covered in mud and leaves after a long walk through Windsor Great Park. I have always loved Dachsunds. There is something incredibly pleasing about their bizarre shape and Elsie never fails to raise a smile or a grimace of frustration with her stubborn personality.

Elsie, my faithful hound, is the inspiration for this project - a Dachshund Draught Excluder. The three dachshund silhouettes are made from black felt appliqued on to calico. The collars are embroidered using backstitch and I have added glamourous gold heart shaped pendants from my bead collection to the collars. The main fabric is Clarke & Clarke curtain fabric which gives the draught excluder a fun retro feel.

Now that the days are getting colder and the nights longer I have the perfect door to place it next to in the corridor near the boys bedrooms. I love the grey dot fabric so much that a complementing roman blind is going to follow!
However, I do have one female companion - our pet Dachshund Elsie. She is by no means a typical lady and is never happier than when she is covered in mud and leaves after a long walk through Windsor Great Park. I have always loved Dachsunds. There is something incredibly pleasing about their bizarre shape and Elsie never fails to raise a smile or a grimace of frustration with her stubborn personality.
Elsie, my faithful hound, is the inspiration for this project - a Dachshund Draught Excluder. The three dachshund silhouettes are made from black felt appliqued on to calico. The collars are embroidered using backstitch and I have added glamourous gold heart shaped pendants from my bead collection to the collars. The main fabric is Clarke & Clarke curtain fabric which gives the draught excluder a fun retro feel.
Now that the days are getting colder and the nights longer I have the perfect door to place it next to in the corridor near the boys bedrooms. I love the grey dot fabric so much that a complementing roman blind is going to follow!
Friday, October 26, 2012
Woolly Jumper Upcycling - Fab Felt Bag
Manmade fibres have accounted for the demise of the 100% lambswool woolly jumper and in general they are few and far between on the high street. I have to say that in terms of fashion I have never been a fan, hating the scratchy feel of the wool against my skin. However, these days I have fallen in love with these jumpers; not for fashion reasons but for crafting and I often scour the local charity shops hunting for unwanted woolly bargains.
The reason for this is felting. It can be a hugely straightforward process involving shrinking a 100% lambswool jumper in the washing machine. This has the effect of binding the fibres in the wool together to make a wonderful dense felted fabric that is ideal for sewing projects which won't fray when you cut into the fabric.. The key is to make sure sure that your jumper is made from 100% lambswool - any hint of a manmade fibre and it just won't work.
All you need to do is throw your unwanted jumper into the washing machine and wash on a hot or boil wash - 90 degrees works best. This will shrink your jumper to approx two thirds of its original size but will have magically bound the fibres to give it a thicker feel. Once dry it will be ready for a new life in the form of any sewing project that takes your fancy.

When I found the above jumper in my local charity shop I was delighted - colourful stripes for fab
upcycling ideas. So I have set myself the task of producing three projects from a single unwanted jumper....
Once you have added any embellishments, pin the two pieces together with the right sides facing inwards and sew around the edges with a 1/2 cm seam. Backstitch is good as it gives extra strength or you can use a sewing machine. Turn the bag the right way around. To neaten the top edges fold inwards 1cm of the fabric and sew to give a neat edge.
To make the handles cut two strips 3cm wide from the sleeves of the jumper and fold over each other to form a tube shape then secure in place using overstitch. Position these on the inside of the bag and secure with a few stitches.
Once complete all you need to decide is whether to give as a gift or to keep for shopping expeditions! More woolly jumper upcycling ideas to follow.
The reason for this is felting. It can be a hugely straightforward process involving shrinking a 100% lambswool jumper in the washing machine. This has the effect of binding the fibres in the wool together to make a wonderful dense felted fabric that is ideal for sewing projects which won't fray when you cut into the fabric.. The key is to make sure sure that your jumper is made from 100% lambswool - any hint of a manmade fibre and it just won't work.
All you need to do is throw your unwanted jumper into the washing machine and wash on a hot or boil wash - 90 degrees works best. This will shrink your jumper to approx two thirds of its original size but will have magically bound the fibres to give it a thicker feel. Once dry it will be ready for a new life in the form of any sewing project that takes your fancy.
When I found the above jumper in my local charity shop I was delighted - colourful stripes for fab
upcycling ideas. So I have set myself the task of producing three projects from a single unwanted jumper....

....and here is the first - a cute and colourful handbag. It is the sumplest thing to make. Cut two pieces of the fabric in any shape. For this bag I chose a rounded bottom and added a simple flower. This was made by using the cuff from the jumper with a big pink button in the centre which matches one of the woolly stripes. Once you have added any embellishments, pin the two pieces together with the right sides facing inwards and sew around the edges with a 1/2 cm seam. Backstitch is good as it gives extra strength or you can use a sewing machine. Turn the bag the right way around. To neaten the top edges fold inwards 1cm of the fabric and sew to give a neat edge.
To make the handles cut two strips 3cm wide from the sleeves of the jumper and fold over each other to form a tube shape then secure in place using overstitch. Position these on the inside of the bag and secure with a few stitches.
Once complete all you need to decide is whether to give as a gift or to keep for shopping expeditions! More woolly jumper upcycling ideas to follow.
Thursday, October 18, 2012
Stylish Ghoulish Bags
Usually at this time of year I drag our set of three plastic pumpkin buckets bought many years ago from the local supermarket out of a box in the loft for our annual trick or treat expedition. I shall probably do the same thing all over again this year as I have three boys who favour plastic!
However, I have turned my thoughts to deisgns for stylish home sewn trick or treat bags and have come up with these designs as an alternative for children or adults who are looking for a more individual look whilst gathering Halloween treats.

Childrens' imagination can really run wild with these bags which are simple to make and cost about the same or even less than those you can buy in shops. All of the bags are made from felt rectangles measuring 20 x 30cm, - an ideal size for cramming full of sweets when adults accompany them on the trick or treat rounds this 31st October. The edges are sewn with blanket stitch for added strength and two felt handles are sewn securely at the top with buttons to decorate.
Children young and old seem to love skull motifs whether they are based on Goth designs, Mexican Sugar Skulls or the more traditional skull and crossbones favoured by pirates. With this in mind I have added my own simple skull design to one of the bags. The witches' cat looks elegant with her gingham collar and and pendant and finally.......a pumpkin bag as a nod to our family's plastic buckets!

Tuesday, October 16, 2012
Planting for Christmas
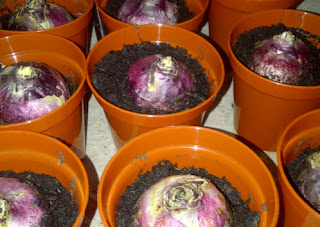
Strictly speaking the purpose of this blog is to pass on sewing ideas so it is probably surprising to find a picture of bulbs on it but bear with me please.
My father is a horticulturalist by profession and as a teenager I spent many hours working at his garden centre near our family home. Unfortunately, I didn't inherit his green fingers but I did discover plants that I love - hyacinths being one of many. I love the scent that fills the house and always buy a planter filled with hyacinths around Christmas time.
This year I am determined to give as many gifts with a personal touch and these bulbs form part of my plan. I have followed my Dad's instructions and the bulbs now sit in individual pots of bulb compost in our garage being "forced" and if all goes according to plan and I remember to water them in approximately 8 weeks time they should be ready for stage 2 of my Christmas gift idea. Fingers crossed.
The sewing part of this project will definitely follow in about six weeks time and I am looking forward to sharing the results.

Saturday, October 13, 2012
Love Your Mummy!
Continuing with the Halloween theme - here is a great project for kids for a rainy Autumn afternoon.
Mummy dolls are so simple to make and they can be dressed up or down. For the traditionalists you can stop at the bandage stage but to me my Mummy Doll just looked too bare so I have accessorised with a felt heart to show her sweeter side and a ribbon at a jaunty angle.
Incredibly simple to make children will love them. All you need is felt, buttons, thread, soft toy filling and a small roll of cotton bandage. For the base doll I used some dark grey felt which had been sitting in my workroom needing a purpose for some time. It gives the dark shadow effect behind the badages on the face, but any fabric is fine as it will be hidden.
Make a body shaped template and cut out two from the felt or base fabric. Sew on the button eyes. I used two buttons - green and black, but beads can be just as effective. Pin the two shapes together and using small stitches sew around the edges leaving a small gap for filling. Add the filling and sew up the gap.
Now it's time for bandaging your Mummy. Wrap the cotton bandage around the legs working your way upwards across the body towards the arms. It may be easier to cut the bandage and secure with a few small stitches before starting again with the arms and head. Any gaps can be covered by securing the bandages with small stitches.
Ideas for accessorising your Mummy - a small beaded necklace, a bow tie, or even a small flower corsage. Why not make a family?
Friday, October 12, 2012
Halloween Just For Me
We love Halloween in our home. One of my boys even says he prefers it to Christmas. Although I am sure if we decided to celebrate All Hallows Eve instead of Christmas he may have a huge rethink.
A Monster Halloween Party became a tradition in our family many (full) moons ago. Last year we entertained 30 children and 20 adults with a garden party at home with all manner of games and tasty treats and this year we plan to do the same. The boys first began discussing this year's party in February at which point we all had to agree that Halloween planning was firmly off limits until at least 31st July!
As you can imagine this has become a regular topic of discussion over the past couple of weeks in our household. Costumes are yet to be decided upon but one thing has been made to clear to me: this year I have to make more of an effort than just dragging my pair of neon yellow and black stripey tights out from the bottom of my drawer where they remain from one 31st October to the next!
As the boys grow older they are moving away from the cute costumes and fun decorations that so often adorned the house and as far as they are concerned, the more gruesome the better. Although they appreciate the work that goes into my home made decorations they would much rather have a groaning plastic ghoul hanging in the porch to greet trick or treaters than a goggle eyed, woolly legged fabric spider!
I am sad to say that this year at Hope & Gloria Sewing Clubs we have had no opportunity for Halloween decorations. Half Term is later than usual so our workshops will mean the start of many Christmas Projects, and in schools we have been so busy with our Woodland Creature inspired projects that there has been no time to fit in the odd felt pumpkin or fabric Witch's Cat.
So this year my Halloween Projects are just for me! The first is my Fat Bat Door Garland. I was really happy with the result and it will look fab hanging over one of the doors inside our home this Halloween - I guess the boys may win with the ghoul on the porch, but I plan to make many more Halloween themed garlands to hang indoors - results to follow soon....

Subscribe to:
Posts (Atom)