Hope & Gloria - Sewing Inspiration for Children

Hope & Gloria - Sewing Inspiration for Children
Happy Mother's Day UK

Thursday, December 21, 2017

It's The Most Wonderful Time of The Year!


It has been a woefully long time since I last posted here...three months to be exact!

Times have been a changing in our house and at Hope & Gloria meaning I haven't been able to find the time to update this blog. My family and I have made a major move - all the way across the Atlantic and onward to the Pacific Northwest of America!

I am happy to say that we are all adoring life over here but also that Hope & Gloria continues to go from strength to strength back home in the UK thanks to modern technology and the brilliant team of ladies that I work with.

My wonderful colleague Allison has stepped up to take charge of the day to day administrative side of the business, meaning I can continue in my role as Director, designer and marketeer for Hope & Gloria from the other side of the world.

I am beyond excited about the inspiration for future sewing projects that this beautiful part of the world is sure to bring and I am happy to report that now that most of our boxes are unpacked I have found some time to finish my festive wall art picture (see above). I think this could be the first in a series of designs that I may simplify for sewing club projects next year.

In the meantime I am delighted to share a few pictures of projects completed this half term in Hope & Gloria Sewing Clubs. Knowing that our move was approaching, I actually designed these projects back in June - it is fantastic to see them finally completed by our talented club members months later.


As always, the Hope & Gloria Sewing Enthusiasts have proved that they are indeed a very talented and creative bunch and all of the amazing sewing club leaders should be proud of the help and guidance they continue to give every week.


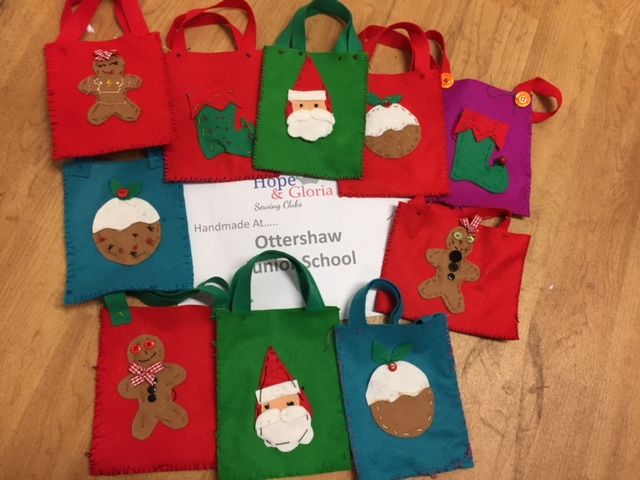
Aren't they amazing? Whoever receives their Christmas present in one of these adorable gift bags is very lucky indeed!

Wishing you and yours the Very Merriest Christmas!
Keeley. x


Thursday, August 31, 2017

Knot Too Tricky At All! Handy Techniques for Tying Knots....


Next week is one of my favourite times of the school year - the beginning! It's a time when we get to say "Hello" to lots of new club members, all eager to learn lots of lovely sewing skills and embark on a fantastic new hobby. It's also time to say "Welcome Back!", to existing members after the summer break.

During the first few weeks in Hope & Gloria Sewing Clubs we aim to teach what we call "the basic skills". These are threading needles, sewing a basic running stitch and tying starting and ending knots.

Once a child can master these they can really gain a level of independence that allows their creativity to flourish. 

Threading  a needle is not always as easy as it looks and last year I shared a blog post on tips for making threading a needle a little bit easier. You can Click here for a refresher.

Ahead of our return to school, I thought it would be useful to share a few tips on how to tie what we call starting and ending knots in Hope & Gloria Sewing Clubs. Practice these at home and you'll be flying through exciting sewing adventures in no time!

Starting knots - There are many techniques that can be used by children to tie a starting knot. It can be difficult to make sure that the knot is placed at the bottom of the thread and it's a matter of finding a technique that they are comfortable with.

Here's one that I have found children tend to pick up pretty quickly....


1. Once you have threaded your needle pinch the bottom of the thread between your left finger and thumb.


2. Wrap the thread once around your index finger continuing to hold the end of the thread between your finger and thumb. Keep the thread slightly loose so you can slide a needle through it.


3. Carefully, slide the needle under the loop you have made, taking care to avoid scraping your finger! You can also slide the loop off your finger before threading the needle through the back of it if you find it easier.


4. Pull the needle and thread all the way through.


5. Slide the loop off your finger taking care to keep hold of the end of the thread while your other hand pulls the needle.


6. Pull both ends tight and you will have a lovely knot - you're now ready to begin sewing.

Handy Hint: If you are sewing using a larger needle it will make bigger holes in the fabric, so you will need to make a larger starting knot. To do this using the technique above, at step two just wrap the thread around your finger a couple more times - this will make a fatter knot.


Ending knots - hugely important for ensuring that all that beautiful stitching doesn't come undone after all that hard work...! Here's how we do it the Hope & Gloria Way:


1. Thread your needle underneath your last stitch, or one that is very close to where you have finished sewing.


2. Pull your needle and thread through until you have made a small loop (make sure you don't pull the thread too far and pull the thread too tight).


3. Thread the needle through the back of the loop you have made and pull the thread through.


4. This time pull it tight to make a knot. The knot you have made is now anchored to the stitch, keeping it secure and none of your lovely stitches will come undone!

Happy Sewing!

Thursday, April 13, 2017

Eggcellent Easter Projects!


At the beginning of last half term the Hope & Gloria Sewing Club Leaders and I presented our club members with a challenge; if they mastered two new stitches over the course of the half term and used them to embellish and add a personal touch to my original Spring Wall Art designs they would be awarded with a Hope & Gloria Embroidery Skills Certificate.


Knowing how enthusiastic our club members are about sewing, we fully expected them to rise to the occassion, however, I have to say that we were all astounded by the quality of work and how amazing the wall art projects turned out to be. Who wouldn't be proud to have one of these amazing projects hanging on their wall as part of the Easter celebrations this weekend? A huge well done to all - I can't wait to see what you make next half term, and in the meantime, Happy Easter to All!


St Ann's Heath


Keep Hatch Monday


Keep Hatch Tuesday


Lovely Work From Phoebe at Nine Mile Ride School


More Lovely Work from the girls at Holy Trinity School, West End


Holy Trinity Primary School


Monday, April 10, 2017

Easter Adventures in Embroidery


I am a huge fan of embroidery. In terms of a relaxing mindful activity, it has to be one of the best as far as I am concerned. Creating a picture, pattern or design using just a needle and brightly coloured thread is hugely satisfying and it is always fun to see where your needle and thread will take you.

Last half term it was all about the stitches at Hope & Gloria Sewing Clubs. The Hope & Gloria Team and I passed on our embroidery skills to our club members and I thought it would be fun to share a few more Easter themed stitched/embroidered projects that I have made that could be made at home using these new found skills.....

Bunnies are always a favourite motif to use in projects at this time of the year - after all, it's only a few days until the Easter Bunny pays a visit to homes across the land! Here are a couple of my vintage inspired bunny decorations. I'll be hanging a few of these on a twig tree at the weekend to decorate our home.


They are very simple to make - just cut out two rabbit shapes in white felt and get doodling with thread on the front of one to add pretty floral patterns in lovely spring colours. The flowers on my bunny are made using a simple star stitch with a contrasting coloured stitch in the middle. Add a stitched eye and a bow then sew around the two edges adding a small amount of stuffing. Sew a loop through the top and they are ready to hang.

This stitched Easter Egg picture is a great way to showcase embroidery skills.


I have used six small egg shapes to decorate using different stitches, but one large Easter Egg with oodles of brightly stitched patterns would work just as well. I stitched the eggs during our sewing club sessions last half term - every time I was asked to demonstrate a new stitch by our club members I used a felt egg shape to do so. It seemed a shame to not use them once the term was over, so this is what I chose to make with them! It's a fabulous way to show off your embroidery skills and also makes a lovely piece of art to hang on the wall every Easter. Why not give it a go?

Finally, why not take a look at this post from the Hope & Gloria Blog archive? Doodling With Thread It's an Easter themed post that I wrote a coupe of years ago and you can find inspiration for making lovely egg decorations like these....


We've still got a few days until the Easter weekend, so why not get your needle at the ready and get stitching? Doodling with thread can be sew much fun! Enjoy!

Saturday, February 18, 2017

Threading Your Needle....A Few Handy Hints!


At Hope & Gloria Sewing Clubs we are often asked by parents who are keen to support their children in their new hobby, how they can help them to learn to sew at home.

By far and away, one of the best ways to get ahead with sewing at a young age is to learn to thread a needle independently. Sewing Club Leaders are, of course, always on hand to help club members who are struggling, but the best way to get the most from a sewing club session is for children to be able to thread their needles quickly and get on with the fun part - the sewing!

Threading a needle can be frustrating when you are first learning to sew. It's an old adage but practice really does make perfect and if parents can spend some time helping children to perfect their needle threading at home, this will really give them a head start when it comes to getting on with sewing at home or when making our lovely projects at their sewing club.

I thought I'd put together a list of tips and hints on how to thread a needle....

1. Always sit down to thread your needle - when you are starting out with your sewing adventures, sitting down will stop any wobbles making it easier to concentrate.

2. Make sure the eye of your needle is large enough for the thread you are using!

3. Cut your thread on an angle - 45 degrees is good. In this way you are making the end of the thread slanted and easier to get through the eye of the needle.


4. Rest your hands on a table while you are threading it - again, less wobbles so easier to get the thread through the eye of the needle.


5. The eye of the needle will be different on each side. If it's not working for you from one side, give your needle and turn and try from the other.

6. If your thread is fraying try one of the following:
  • Cut the thread again a bit further along so that you have a straight edge to work with
  • Lick the end of your thumb and forefinger and press the end of the thread flat.
  • Moisten the very end of the thread (just a little),  by placing it between your lips. (This technique is very popular in our sewing clubs but don't make the thread too soggy, or it will become tricky to thread!)
7. If it just isn't working for you using one end of the thread, turn the thread upside down and try from the other. All thread is twisted, so it will be at a different stage in the twist at the opposite end of the thread and may make it easier to push through the eye of the needle.

I hope these tips help and good luck with your practising!

Sunday, February 12, 2017

Marvellous Mini Project Sewing Club Gallery


The first half term of 2017 came to an end for Hope & Gloria Sewing Clubs on Friday.

It was the shortest half term of the school year made up of just five weeks. However, that didn't mean that the amazing Hope & Gloria club members had to compromise when it came to making their projects - the opposite in fact, they were able to make and take home a whole range of fun, fabric mini-projects which they should all be very proud of.

In each school year there is always one half term that is shorter than the rest and my design challenge is to come up with an idea for projects that is achievable, lovely to look at but above all fun to make during this short space of time. Mini-projects are always a delight to design - they must be fun but simple, as well as being easy to make in our clubs. We find children love to have the opportunity to work on a range of quick and easy projects from time to time.

This year, I am pleased to report, proved to be no exception. Hope & Gloria sewing enthusiasts were able to choose from Woodland Wildlife Wallets (see pic above), Felt Friendship Bracelets,


or cute and quirky keyrings...


As always at Hope & Gloria Sewing Clubs our club members were total stars making the most adorable projects and I'd like to say a huge "Well done" to all of them. I am delighted to share some of the projects with you below - aren't they brilliant?!


Wishing all of our club members a brilliant half term!

See you after the break for our "Spring Has Sprung Wall Art" projects!