
In order to be successful in sewing projects there are a few basics which we consider essential at Hope & Gloria sewing clubs. By mastering these stitches below you will find that you can create fabulous sewing projects with ease and achieve great results.
Running Stitch
This tends to be the first stitch that we learn and is an old favourite. You can do this simple stitch by moving the needle from the back of the fabric to the front, then moving the needle from the front to the back. Make sure you pull the thread all of the way through the fabric with each stitch.
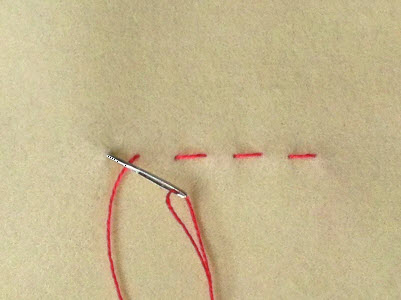
Another technique for running stitch is to push the needle from front to back and then from the back of the fabric to the front in one motion and then pull the thread all of the way through.

Backstitch
Adds strength to seams, great for embroidery and helps to sew in a straight line.
For this lovely stitch begin with one stitch then bring the needle from the back of the fabric to the front as though you are going to do another running stitch. However, instead of pushing the needle through further along the needle goes back to the end of the last stitch and moves through the fabric there.
Repeat this technique again to form an unbroken line of stitches. It can be used to make straight or curved lines.

Over Stitch or Whip Stitch
Over stitch, also known as Whip Stitch is used to sew two layers of fabric together along the edge. Think of it as wrapping the thread around the outside edges of the fabric to join them.
To begin, start at one end and move the needle from the back through both layers to the front. Repeat this process leaving a short space between each stitch. A top tip is to wrap the thread around the back in-between pushing the needle through from the back. This will help to keep the stitches neater and even.

Blanket Stitch
This is a lovely decorative stitch and also adds strength to seams as well as making outside edges lovely and neat. It is one of our favourites at Hope & Gloria!
Blanket stitch is done by pushing the needle through both layers of fabric from the top edge, then before pulling the needle all the way through pass the needle through the thread loop on the outside of the edge. If this is tricky another technique that works is to push the needle through both layers and then wrap your thread around the front of the needle before pulling it through.
Once you have got to grips with these basic stitches the sky is your limit - Happy stitching!
I always have a hard time remembering HOW to start the hand blanket stitch. No one ever shows or states that process.
ReplyDelete(Where do you put your knot, to get started??)
ReplyDeleteHello - I usually put the needle through the inside of both pieces of fabric pushing out of the bottom layer. This hides the knot on the inside. Then push the needle through the top piece of fabric in the same place pushing out through both layers but pulling the needle through the loop to give you a base stitch to continue from.
ReplyDeleteHope this helps! You make a good point - when I have time I will post a tutorial on how to get started.